Light and shadow are the silent storytellers of any artwork. Whether you’re creating a detailed portrait or a fantastical landscape, mastering how light interacts with your subjects can dramatically enhance the realism and emotional impact of your digital art. In this blog post, we’ll explore essential techniques and practical tips to help you understand and apply light and shadow effectively in your digital pieces.
Why Light and Shadow Matter in Digital Art
Before diving into techniques, let’s clarify why light and shadow are so important:
- Create Depth: Light and shadow help simulate three-dimensionality on a two-dimensional surface.
- Set the Mood: Different lighting scenarios can evoke various emotions.
- Direct Focus: Light guides the viewer’s eye to the focal points of your artwork.
- Define Form: Shadows and highlights help to clarify the shapes and contours of objects.
Mastering this fundamental skill will not only make your art more lifelike but also improve your storytelling capabilities.
1. Understand Light Sources
Everything starts with the light source. The direction, distance, and intensity of your light dramatically influence the shadows and highlights in your piece.
Types of Light Sources:
- Natural Light: Sunlight, moonlight, usually strong and directional.
- Artificial Light: Lamps, candles, neon lights can vary widely in warmth and intensity.
- Ambient Light: General light present in the scene, usually softens shadows.
Tip: Always decide your light source early in the process. You can sketch a small lighting thumbnail or diagram to keep your shading consistent.
2. Core Light and Shadow Terms Every Artist Should Know
To speak the language of light, you should understand these core terms:
- Highlight: The brightest part of the object where light hits directly.
- Core Shadow: The darkest part of the object, where light is completely blocked.
- Cast Shadow: Shadow thrown by the object onto the surrounding surface.
- Reflected Light: Light that bounces from nearby surfaces onto the shadowed area.
- Occlusion Shadow: The darkest, most concentrated shadow in the areas with minimal light penetration (e.g., crevices).
Knowing these terms helps you analyze real-world references and replicate the effects in your digital canvas.
3. Practical Shading Techniques in Digital Art
Let’s break down the hands-on techniques you can use with any digital painting software like Procreate, Photoshop, Clip Studio Paint, or Krita.
A. Soft and Hard Brushes
- Use soft brushes for smooth transitions and soft lighting.
- Use hard-edged brushes to define strong contrasts and crisp shadow lines.
B. Build Up with Layers
Use multiple layers for:
- Base colors
- Shadows (set to Multiply)
- Highlights (set to Screen or Overlay)
C. Gradient and Airbrush Tools
Perfect for ambient lighting and large shadow areas. Use sparingly to avoid a blurry, low-contrast look.
D. Erase with Intention
Use your eraser tool with a soft brush to subtly lighten areas, helping you control the softness of light.
E. Use Selection Tools
Isolate areas like a face or hand, and apply shadows without affecting the rest of your work.
4. Light Direction and Shadow Mapping
Understanding light direction is key to realism.
Common Light Directions:
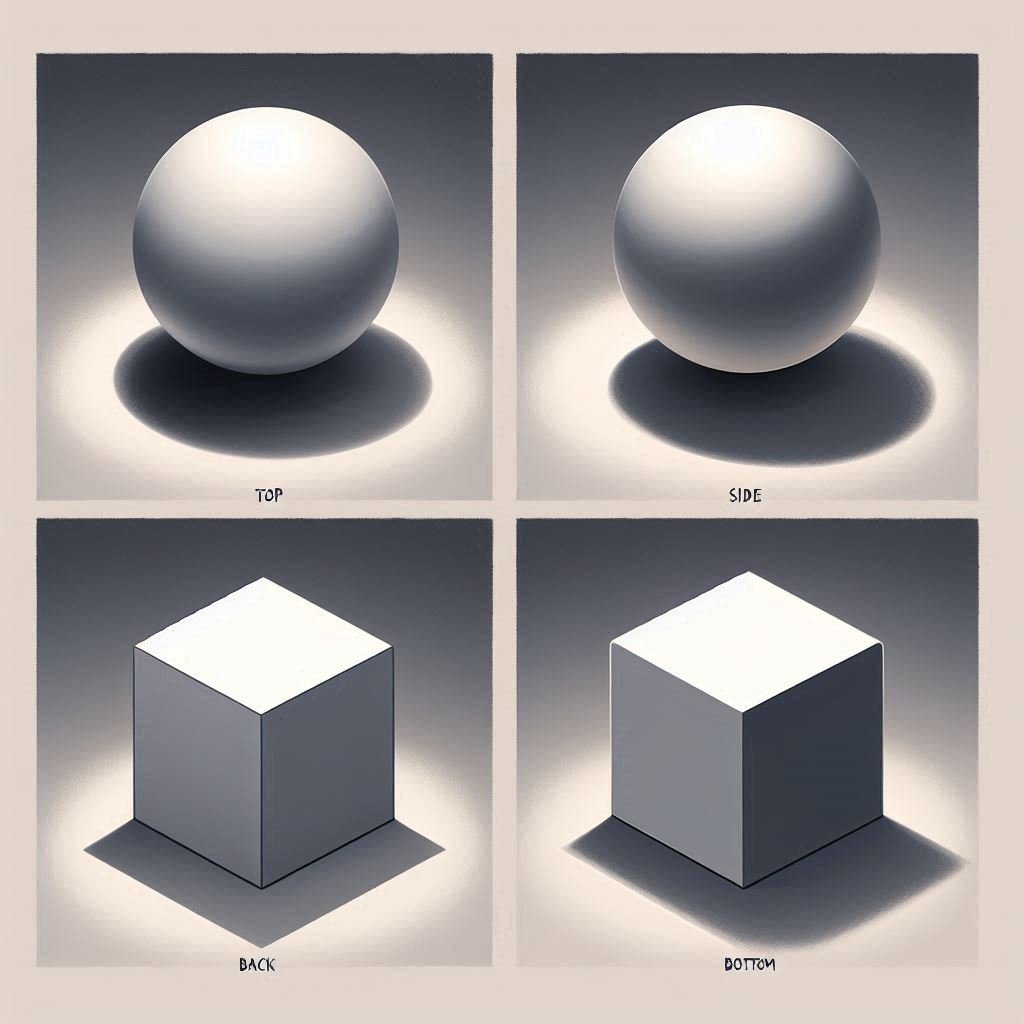
- Top Down: Natural outdoor lighting; casts shadows below objects.
- Side Light: Great for drama and contrast.
- Back Light: Creates silhouettes and rim lighting.
- Bottom Light: Unnatural or spooky effect (used in horror scenes).
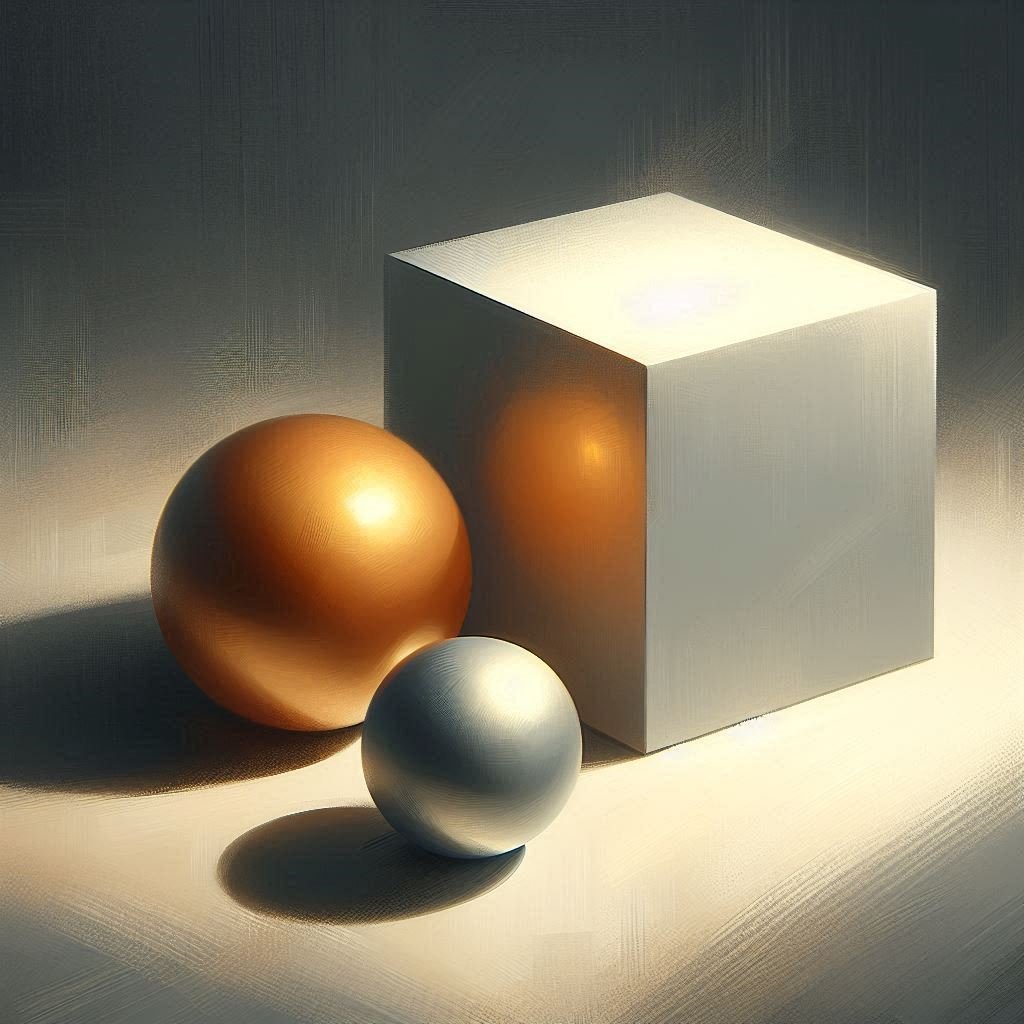
Shadow Mapping Tip: Use a 3D reference or a photo of a simple shape like a sphere or cube to understand how shadows behave from different directions.
5. Practice with Basic Forms

Start by practicing with:
- Spheres: Perfect for studying soft gradation of light.
- Cubes: Great for learning hard edges and multiple planes.
- Cylinders and Cones: Useful for organic shapes like arms or tree trunks.
Once you’re comfortable, apply those same lighting principles to your characters and scenes.
6. Color and Light Interaction
Light doesn’t just affect brightness, it also affects color.
- Warm Light (e.g., sunset): Will make shadows appear cooler.
- Cool Light (e.g., moonlight): Will make shadows warmer.
- Use Color Dodge layers for vibrant highlights.
- Use Overlay or Multiply for color-rich shadows.
Also, remember that materials reflect light differently:
- Metallic: Sharp, high-contrast reflections.
- Matte: Softer and more diffused shadows.
7. Common Mistakes to Avoid
- Overblending: Makes your art look flat and muddy.
- Wrong Light Source Consistency: Keep shadows aligned with your light source.
- Too Much Black: Real shadows are rarely pure black. Use dark colors.
- Ignoring Reflected Light: Even in shadows, some light bounces back.
Fixing these small issues can greatly improve the realism of your work.
8. Study Real Life and Masters
Always return to the fundamentals:
- Study photos with strong light and shadow contrast.
- Try painting black and white studies.
- Analyze works by masters like Rembrandt, Caravaggio, or modern digital artists.
Observing real life is the fastest way to sharpen your light and shadow intuition.
9. Tools and Resources
- 3D software like Blender to set up lighting references.
- Pose and Lighting Reference Apps: Magic Poser, ArtPose.
- Photography Lighting Kits: Small desk lamps or natural light setups.
- Use photo packs or custom references for practice.
Stay tuned for our upcoming post: “Creating Texture in Digital Art”, where we’ll dive deeper into how light interacts with various surface types.
Explore Light and Shadow in Our Picture Collections
If you’re looking for visual inspiration or reference material, check out our curated image galleries on PictureGate. From divine art and iconography to minimalist portraits, our collections demonstrate powerful uses of light and shadow across different themes. These examples can help you understand how lighting enhances emotion, depth, and storytelling in both photography and digital artwork.
Visit these sections to explore more:
Use them as creative reference points when practicing the techniques from this post!
FAQs: Light and Shadow in Digital Art
Q: What’s the best way to learn shading for beginners?
A: Start with basic forms like spheres and cubes. Use a single light source and practice replicating light and shadow transitions.
Q: How do I know where to place shadows?
A: Determine your light direction first. Imagine or draw lines from the light source, shadows fall on the opposite side of the object.
Q: What brush settings should I use for shading?
A: Use low-opacity soft brushes for smooth gradients and hard brushes for defined edges. Adjust flow and opacity to match your desired effect.
Q: Can I use photo references?
A: Absolutely. Using photos or 3D renders for reference helps you understand real lighting behavior, which you can adapt into your stylized work.
Q: Should I always use multiple light sources?
A: Not necessarily. Start with one light source for clarity. Multiple lights can be introduced for complex scenes, but keep them consistent.
Final Thoughts
Mastering light and shadow takes time and observation, but it’s one of the most rewarding skills in digital art. With regular practice and a solid understanding of light behavior, your illustrations will gain depth, realism, and emotional power.
Stay tuned for more posts in our Digital Art Techniques series. Next topics will include:
- “Creating Texture in Digital Art“
- “Digital Color Theory for Beginners“
- “Painting Realistic Skin Tones“
- “Dynamic Lighting for Action Scenes“
Did you find this post helpful? Bookmark PictureGate.org and follow our Digital Art Techniques category for more tips, tutorials, and inspiration!


2 Comments on “Mastering Light and Shadow in Digital Art: Tips for Realistic Depth 2026”